Re: Prototype Dragon Puppet Posted by Cantata on Aug 17, 2012
Hah, oh man I got distracted. Anyway, I started on a smaller prototype when I realized the cost of materials for a big one was going to be quite a bit.
Also, I wanted to test out a different eye design. This one came out much closer to what I was hoping for.
" frameborder="0" allowfullscreen>
https://youtu.be/7WceKERtZFY
Also, I wanted to test out a different eye design. This one came out much closer to what I was hoping for.
" frameborder="0" allowfullscreen>
https://youtu.be/7WceKERtZFY
Re: Prototype Dragon Puppet Posted by Shawn on Aug 18, 2012
Ok you have my attention! How did you accomplish this? I am also curious about the construction of his neck. What is that all about?  Love the sculpting on the head!
Love the sculpting on the head!Re: Prototype Dragon Puppet Posted by Cantata on Aug 19, 2012
Thanks! He's kind of grown on me.
The eyeballs themselves are firmly stuck in place, so they do not physically move at all. It's an optical trick.
First I made balls of sculpey and smushed a depression into them that was about 1/3 of the way up the marble. Then I baked them. Then I painted the bowl-shaped depression like an eyeball.
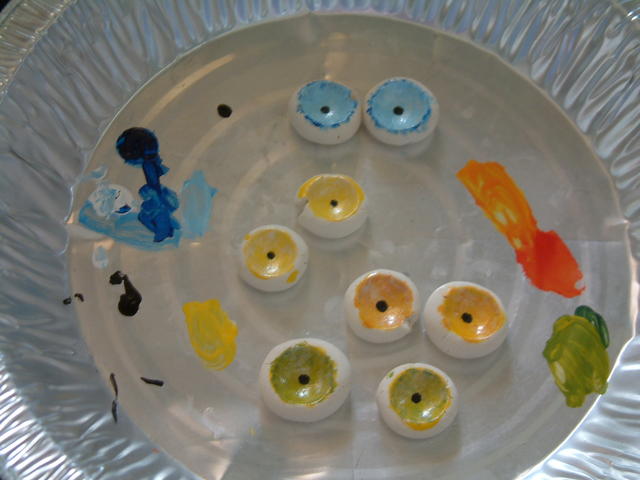
Because it's in a depression, lighter colors are much more effective. If you're wanting a dark eye, paint it several shades lighter than you intend it to be. It also helps to have some sort of reflectiveness on the iris. I used some irridescent watercolor medium, but anything would probably work. I've got some UV nanoglitter in the mail to play with. Muahaha!
For each eyeball you need two lenses. One lens will fill up the depression and leave the eye with a level surface. The second lens will sit on top of that. I used clear resin to glue them in place. You have to be careful of air bubbles.
For lenses, I experimented with pouring my own with clear epoxy resin. It worked pretty well at first, but after a few days the resin started to yellow, which was disappointing. I used a white plastic paint tray as a mold at first. These are larger lenses. You can see the different degrees of yellowing. It won't matter too much on the prototype because his eyes are yellow anyway and I'm keeping him.
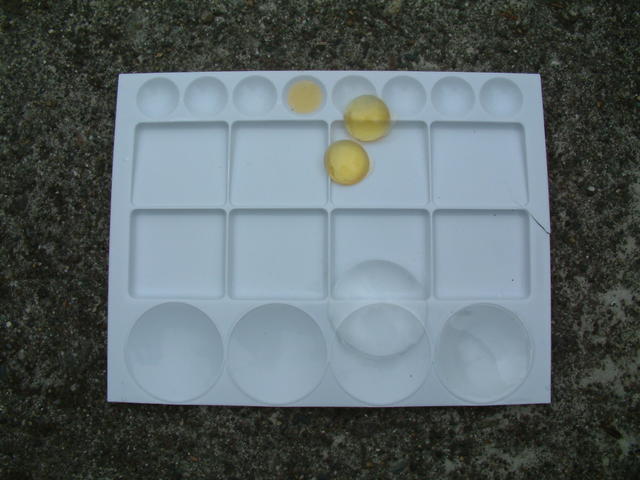
I've got some glass jewelry cabochons on order from Ebay, hopefully they'll work because then there won't be any worry about yellowing and air bubbles.
Tomorrow there should be some pics of finished eyes. My camera ran out of batteries. Most of them got air bubbles so that was kind of a bummer.
Here's a pic of the head form. I sculpted a little skull out of sculpey, cooked it, basted it with hair conditioned and then paper mached one layer of brown paper bag and wood glue on it. After it dried I cut it off, then used a bondo/bondo resin mix to glue it back together. It's really strong that way.
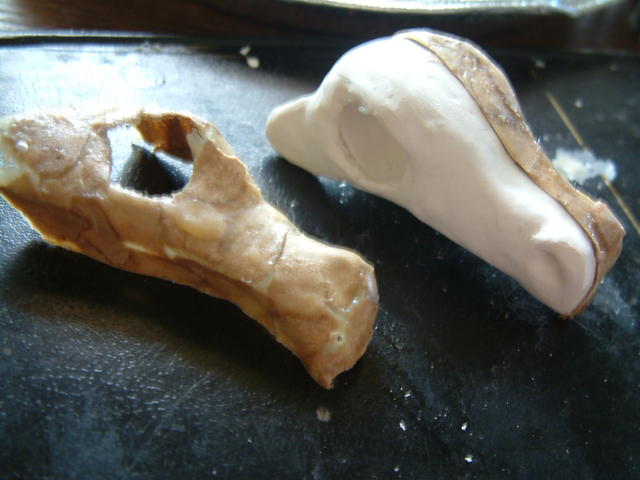
After that stuff set, I used Epoxy Sculpt to skin it.
The neck is an experiment. I'm shooting for a cable operated shoulder dragon that can move its neck and tail. Maybe stick a tongue out too. Once it's functioning I'll make a video and take detailed photos. It's made out of Klixx toys that have paperclips shoved through the joints and bike cables strung through them.
The eyeballs themselves are firmly stuck in place, so they do not physically move at all. It's an optical trick.
First I made balls of sculpey and smushed a depression into them that was about 1/3 of the way up the marble. Then I baked them. Then I painted the bowl-shaped depression like an eyeball.
Because it's in a depression, lighter colors are much more effective. If you're wanting a dark eye, paint it several shades lighter than you intend it to be. It also helps to have some sort of reflectiveness on the iris. I used some irridescent watercolor medium, but anything would probably work. I've got some UV nanoglitter in the mail to play with. Muahaha!
For each eyeball you need two lenses. One lens will fill up the depression and leave the eye with a level surface. The second lens will sit on top of that. I used clear resin to glue them in place. You have to be careful of air bubbles.
For lenses, I experimented with pouring my own with clear epoxy resin. It worked pretty well at first, but after a few days the resin started to yellow, which was disappointing. I used a white plastic paint tray as a mold at first. These are larger lenses. You can see the different degrees of yellowing. It won't matter too much on the prototype because his eyes are yellow anyway and I'm keeping him.
I've got some glass jewelry cabochons on order from Ebay, hopefully they'll work because then there won't be any worry about yellowing and air bubbles.
Tomorrow there should be some pics of finished eyes. My camera ran out of batteries. Most of them got air bubbles so that was kind of a bummer.
Here's a pic of the head form. I sculpted a little skull out of sculpey, cooked it, basted it with hair conditioned and then paper mached one layer of brown paper bag and wood glue on it. After it dried I cut it off, then used a bondo/bondo resin mix to glue it back together. It's really strong that way.
After that stuff set, I used Epoxy Sculpt to skin it.
The neck is an experiment. I'm shooting for a cable operated shoulder dragon that can move its neck and tail. Maybe stick a tongue out too. Once it's functioning I'll make a video and take detailed photos. It's made out of Klixx toys that have paperclips shoved through the joints and bike cables strung through them.
Re: Prototype Dragon Puppet Posted by Shawn on Aug 19, 2012
So are the two different lenses a necessity of the illusion or simply a way to get a domed rounded eye. The reason I ask is I was wondering if a clear marble with a dot on the back would do the same thing?
Re: Prototype Dragon Puppet Posted by Cantata on Aug 19, 2012
The two lenses don't make a sphere when they're back to back. It's as if you cut a third of the sphere out of the middle and then stuck the two end parts together. It looks sort of like a flying saucer by itself. I'm not sure if a marble would work, I didn't have any clear ones to try with. If it does work let me know!
Re: Prototype Dragon Puppet Posted by tbonepearson on Aug 20, 2012
Wow Cantata, great work
Re: Prototype Dragon Puppet Posted by Cantata on Jan 05, 2013
Working on version 1.1 now. I gutted the mechanism parts from the original and am turning that one into a stuffed animal for my daughter. A lot of the bugs have been ironed out, hopefully this one will work out okay.
Demo video of the neck. I'll probably need to tighten up the neck spring, especially as more weight is added to the head/neck with the skin/horns/etc.
Edit: Ha! Finally got the video to work.
Demo video of the neck. I'll probably need to tighten up the neck spring, especially as more weight is added to the head/neck with the skin/horns/etc.
Edit: Ha! Finally got the video to work.
Re: Prototype Dragon Puppet Posted by njventguy on Jan 05, 2013
Very very cool. I'm looking forward to seeing the finished puppet! Great job!
Re: Prototype Dragon Puppet Posted by Cantata on Jan 05, 2013
Thanks! I got some pictures of the head uploaded too. These eyes were painted with UV resistant nail polish, then a coat of orange acrylic paint behind that.
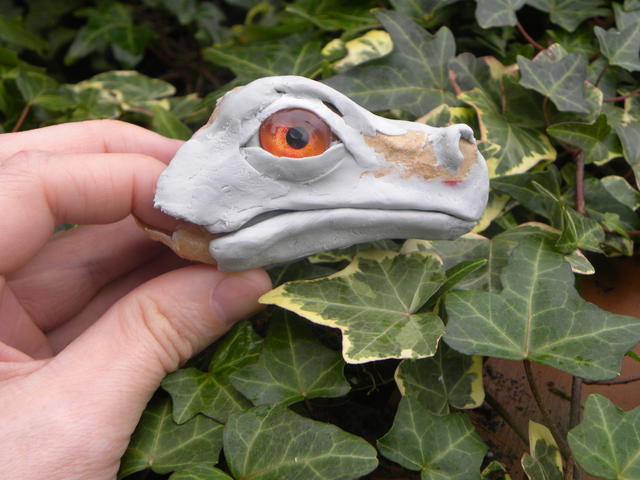
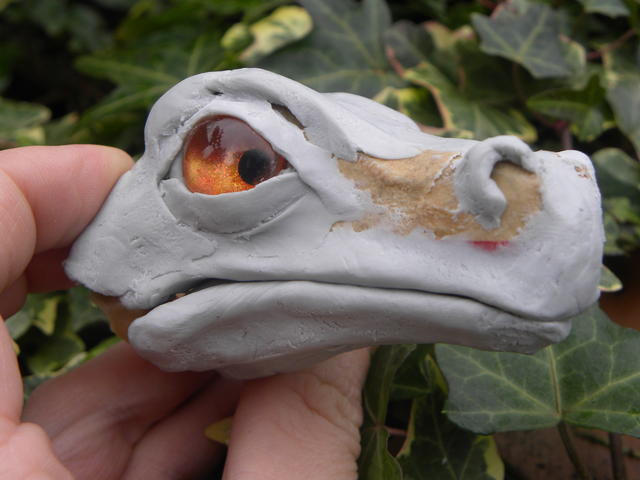
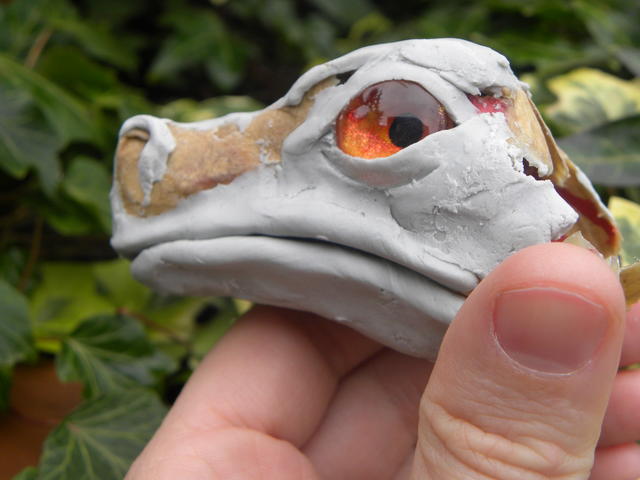
This one has the same style eyes as the first, only the lenses are glass instead of resin. When the kids were roadtesting the prototype the resin scratched really bad, then turned cloudy and yellow so that was out.
This one has the same style eyes as the first, only the lenses are glass instead of resin. When the kids were roadtesting the prototype the resin scratched really bad, then turned cloudy and yellow so that was out.
Re: Prototype Dragon Puppet Posted by Shawn on Jan 06, 2013
I like that he has the long spine. Will he sit behind the neck with his tail on one side and head and neck on the other? Doing a great job! Love the movement you are getting.
Loading
No More Post
Error
Loading